Gradient Editor
With this editor you can create a set of colors to be used as a gradient. A gradient is basically a set of color, mostly a color ramp.The editor can be opened by either selecting the corresponding entry in the menu Colors or double clicking on the gradient display in the main window.
A group of color palette entries defined as a gradient are either selected by a start and an end color index within the color palette or by arranging different colors manually.
To edit a gradient you can Define Colors based on the color palette that opens. Select a linear range or single color entries and add them as gradient slots.
When done you can select and move them around in the slot area. Hold Ctrl and click on color slots to select entries to drag the around or to remove them again. When you hold Shift and click on a slot then all entries between the first and last clicked entry are selected.
Besides defining fixed colors you can also Add Auto Slots. These gradient positions are filled with the best matching color from the palette when considering a color ramp from the first to the second surrounding color. They are updated automatically on palette entry modifications.
At the Functions button you can find the following tools:
Fixate Auto Slots turns auto slots into fixed ones that do not continue finding best matching colors but use the current ones permanently.
Flip switches the color slot order.
Sort will order all colors by the selected criteria.
Reset will undo all changes.
Clear removes all color slots
Edit Palette lets you directly modify the current color palette. So you can shift colors around or create ramps.
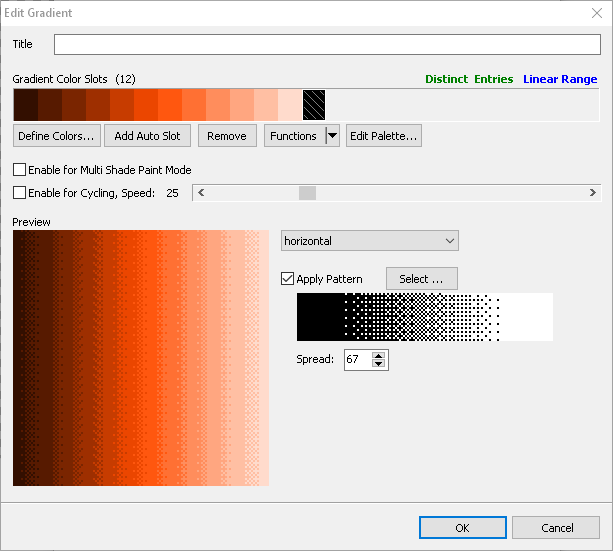
The Preview shows the gradient on a larger area. You can select a scaling halftone or fixed transition pattern that are applied to the transitions of the colors to increase virtual color depth or transition effects. This setting only affects this preview. If you want to enable such patterns when using the gradient for filling an object then you must set them up in the corresponding fill settings.
Use Spread to define the transition size when using a halftone pattern. Find more information please refer to the Halftone Painting Primer.
Gradients that define a linear range of entries in the platte can be used for color cycling. This way you can create images that animate flows like waterfalls or just do a cycling color effect.
For this purpose you have the Color Cycling Speed slider. Here you can give each gradient a unique speed value. This value is defined in steps per second and can go from 0 to 100. To see such color cycling animation on the canvas you can define a cycling speed and start playing back the cycling in the gradient panel of the main window or by just hitting the asterisk key on the numeric keyboard. This playback can stay enabled while you are drawing.
To quickly change the cycling speed of gradients please see the gradient management dialog. Be sure not to overlap gradients that are cycled. Otherwise, you will get wrong results!
If you created an image that uses gradient color cycling then you can turn it into an animation that stores to file by using Create from Color Cycling in menu Animation. A simple color cycling sample looks like this:

As soon as a gradient has distinct entries it can be used for Shade and Multi Shade, see menu Mode.
Related topics
Gradient ManagementMenu Animation
Menu Mode
Workspace
Last modified: 29 January 2023