Alpha Primer
Besides defining the transparency of an image by selecting a palette color entry as being transparent you can also define alpha transparency.Alpha transparency means that every single color pixel has an individual value that defines the opacity of this pixel. This alpha value may range from 0 (completely invisible) to 255 (fully visible), where it is usually scaled to be a value between 0 and 100%. These alpha values are stored in a second pixel plane. If you have a project with alpha plane then the transparency settings in the main form will turn to:
You can define the opacity for pixels that are newly painted. Opacity works usually kind of additive. That means if a pixel has an opacity value 30%, and you draw over it with an opacity ov 20% then those 20% are added relatively to the 30% the pixel already has. This way you can change the opacity smoothly while drawing.
General Usage
Since Pro Motion is a software to edit indexed graphics based on color palettes, also the alpha plane uses a palette. The palette then contains the actual alpha values. By default, a 1:1 relation is used, so that index 0 in the alpha palette uses alpha value 0 and index 255 uses alpha value 255. Depending on the settings for the alpha channel (see project settings) this alpha palette may contain other values, e.g. to match certain hardware limitations for the alpha channel as to be found on GB, DS or PSP.Because the alpha plane also has a palette you can use these alpha palette entries as gradients or draw with any of the entries directly at the alpha plane.
You can switch between editing color and/or alpha plane as well as plane visibility in the layer management.
If you use common true color drawing packages then you know that such an opacity setting does not only apply a certain transparency to the pixels but is also used as a level of applying a color effect, e.g. brightening something up or mixing colors. With Pro Motion this is the extra option "Mix" which applies to paint modes where mixing colors based on the opacity makes sense. You can switch it off to apply color the paint mode without mixing.
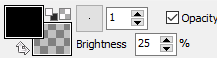
Scalable paint modes such as Brightness also have additional settings that define the strength of applying the paint mode color effect.
Please notice that when using alpha transparency, you must ensure that there is a full white color entry in the color plane palette! This is important because all pixels that are fully transparent must be set to white. When you create an alpha transparent project then the application will select the first white color entry as project background color and this is always used for all pixels that are fully transparent.
Drawing with Alpha
There are three modes to modify the alpha plane data which can be selected in the layer management window.Edit color and alpha
This mode is used to draw on the color plane and the alpha plane at once. You can then use an opacity value from 0 to 100 that defines how the transparency of the pixels are to be modified. The larger the opacity value the more opaque the pixels will become with every drawing step. This is the way how common drawing packages work with alpha transparency.
Edit alpha only
If you edit the alpha plane only then you draw directly into the values of the alpha plane as you would do with the color plane. The color palette then turns to contain the alpha values displayed as gray shades. You can select a "color" (=alpha value) there and draw it value into the alpha plane bitmap which will make the corresponding color pixels to be more or less visible.
Edit color only
If you don't want to touch transparency then you can disable the alpha plane for editing and modify the color plane only.
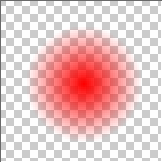
Let's do a simple example top get in touch with alpha and color plane. Create a new project with 100 x 100 pixels in size and enable alpha transparency (see New Project Dialog for details.
Now just draw a filled circle onto the canvas using full opacity. It will look something like that:

If you now switch off the alpha plane visibility in the layer settings dialog using the corresponding icon
 then you only see the color plane without any transparency.
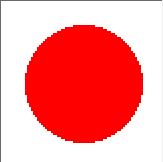
If you now reactivate the alpha plane but deactivate the color plane instead
 then you see the alpha values, in this case only black (fully
transparent) and white (fully opaque).
then you see the alpha values, in this case only black (fully
transparent) and white (fully opaque).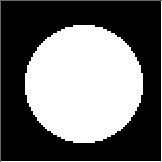
Just for the purpose of getting to know how to manipulate the alpha plane directly please select Edit alpha only right besides the plane visibility switches. When we now draw to the image then the color plane stays unmodified. Select the fill tool and the mode Contour Gradient. By default, the current selected gradient is going from full white to full black which means opaque to transparent since we are working at the alpha plane.
Now just click into the white circle, and it should look like that:
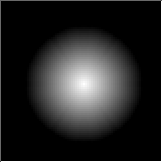
This now means that the pixels of the circle go from the center of the circle to the peripheral like opaque to transparent. Now enable the color plane again to be visible, and you see this result:
So we have used a single physical color and shade its opacity by alpha. As you may imagine you could combine the semi transparent values with the contents of underlying layers. Add a new layer in the layer window (see layer primer if you need to know how). Since it is added on top of the current one please click on it with your mouse and drag it below the layer with the red circle. The layer is still empty, so nothing happens visually.
Switch the plane edit mode back to Edit Color and Alpha. Select a different color from the palette, e.g. green and reselect Current Paint Mode as the fill mode. Now draw a filled circle in the new layer. Let it overlap with the current one. The result looks something like this:

We have generated virtually more colors as we actually used just by using alpha transparency together with layering. You could now do the simple alpha shade fill again with the second circle, but let's do something else.
Select Edit Alpha only again so that we modify the alpha plane and leave the color plane untouched. Select a larger round brush from the brush selector in the toolbox, e.g. 7x7 pixels and select the Paint Tool. From Mode select the paint mode Shade.
When you now move the mouse to the green circle (assuming the layer with this circle is the active one) then you can click and hold the left mouse button and move the mouse across the green circle again and again, going in circle or whatever. The shade paint mode now reduces the alpha transparency the more you draw. The right mouse button would increase the opacity again. If you have the first default alpha gradient selected then this is very slow because it contains all possible alpha values. Effectively you would create a gradient that matches better your requirements. The second alpha gradient uses only 16 out of the 256 alpha shades. Select it, and you will see that the shading is much faster. This makes more sense for plain shading by hand.
You can load the sample project here alpha_sample_circle.pmp. Save it to some place and load it into the application.
Protecting transparent pixels
When modifying the alpha or color plane separately you might want to protect pixels that are currently fully transparent from being modified. To do so just use Select non-transparent Pixels from the menu Selection. It will activate the pixel selection and protect all pixels that are fully transparent. Now you can concentrate on modifying color or alpha values without creating new pixels where you don't want them to be.File I/O
Usually palette based images can not be stored with alpha. To get around this problem the application will save additional files containing the alpha plane data as soon as you use a file type that can not carry alpha data. If you for example store your image as foo.pcx then a second file foo.alpha.pcx will be stored containing the alpha data. When loading such files then such an alpha file is recognized and loaded it into the alpha plane. Same works for animations.There are some file types that support for alpha, but only if the color pixels are stored as 24Bit image layer, e.g. TGA, BMP or PNG. Such files can be stored, but remember that you possibly lose your palette order if you do so, because a color palette can not be stored into such 24Bit files. There is a special option in the project settings that will store the palette data as a separate file to keep it for the next load. But then you must carry this palette file with the image file!
Related topics
Working with BrushesLayer Settings
Contents
Menu Layers
Menu Mode
New Project
Project Preset Edit
Workspace
Last modified: 29 January 2023