Layers Primer
The layer system is used to display different portions of a graphic upon another while being able to edit them separately. This is done by laying them on top of each other as a stack of layers. Depending on the graphic portions that are transparent on each layer you can see the pixels of the layers below.Additionally you can set a layer transparency value to see layers shining through partly. See layer settings dialog for details about how to create and edit layers. Also, you can define certain effects on layer contents or use onion skinning to ease drawing between animation key frames.
And last but not least you can create layer groups to build layer hierarchies.
The layering can be used to cover the following different use cases:
Multi Layer Animation or Image
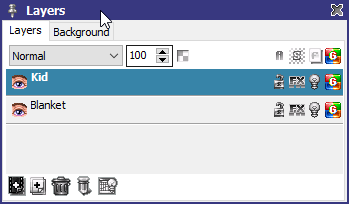
Sometimes it is useful to split an animation into separate object layers for later reuse. For example, you have created a walking game character and this character may optionally carry a backpack. Then it would be necessary to have the sole character animation and a separate layer that contains the backpack. During the game the backpack part can then be switched on or off. For creating such objects and dividing them from other animation parts you can define layers showing different animation feeds combined in a single project.
Also you could initially separate portions of an object into pieces and draw them without touching others and later merge them together when all is done.
The same technique can of course be used for images as well, and you may even create a single image layer for an animation that just uses the same image throughout all animation frames.
Increase Color Depth
Generally you can have a single color palette for all frames of the project, all frames of a layer or each frame can use its own color palette. The latter option is somewhat unusual and is often hard to handle. But it's helpful to use different palettes for different layers.
This enables you to define different color spaces for the different objects or parts your animation or image is made of. With that in mind you actually don't have a limitation of colors since every layer can have its own set of them optimized for it's type of graphic object. Combined with alpha shading or semi transparent layers you can leverage the color impression while still being able to manage them easily and not getting lost in thousands of colors that are hard to handle on pixel level.
General Usage
The layer system is always active because even if you only use a single layer then this can be accessed and modified in the layers window.In this settings window you can define the layers you need. The layer list represents the stack. Layers on top cover the layers below.
Sample: Multi Layer Animation or Image
As an example consider you have created a walking character. This character should be able to wear or to carry different clothes or items while the walk movement remains equal. In this case you can create the character animation as a single project. The different clothes or items would be added using separate layers. Using the layering you can bring everything together visually while still working on separate animations.
Load the corresponding project file to play around.
Now there are different ways to export the animated content into files. When using Save Animation from menu File you can choose how to deal with layers on export. You can automatically merge the layers into one or save each layer to a separate animation file.
Working with multi layered images is just the same. When doing an export into image files the same options apply concerning separated files or flattening layers while saving.
Sample: Increase Color Depth
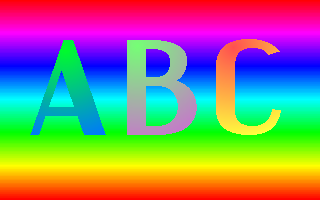
Working with graphics based on color palettes differs much from using true color techniques. One important thing is to have a good sorted color palette with ranges of color shades that make up your image, animation or object color spaces.The usual palette size of indexed color graphics does not exceed 256 colors, but sometimes more colors are required. In this case you can use the layering system to increase the color depth. This is possible because every layer (or even every frame) may have its own 256 color palette. Displaying such frames as layers will show all the frame colors at once.
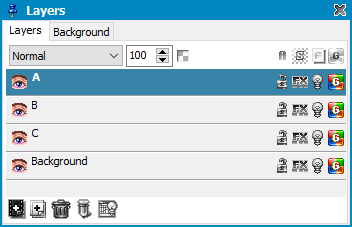
The G sign at the top of all layers is switched off while it is enabled on every layer. That means, that there is no global color palette for all layers. Instead, every layer has its own color palette. If the G sign would also be disabled for a layer then every frame of that layer would have its separate color palette.
When storing high-color image or animation files you must keep in mind that when flattening the layers on the fly the resulting graphic might not fit into certain file types without loosing quality. Because when storing high-color graphics into a 256 color file type then the number of colors is automatically reduced to not exceed 256 colors.
Today most game engines can handle true color files, e.g. sprite sheets. In this case you should use file types like PNG Sprite Sheet 24/32-Bit or BMP Sprite Sheet 24/ 32Bit. They are able to support full color and even alpha transparency. For simple images you can use any 24/32-Bit true color format that is available, e.g. PNG, BMP or TGA.
Download the sample project to check in detail.
Working multiple Layers at once
In the layer window you can also select multiple layers at once using Ctrl / Shift when clicking on a layer. You can then apply transformations or move all the layer contents around. You can even copy and paste multiple selected layers. This also works with selections.Onion Skinning
A common technique to create smooth animations is onion skinning. With this you initially draw or sketch draw some key frames of an animation and then create the frames between those key frames. This requires that you can see the key frames while drawing one of the frames in between.That's what the light table does. The light table can be set up in the light table settings that are available through the layer window. By default, it looks like this:
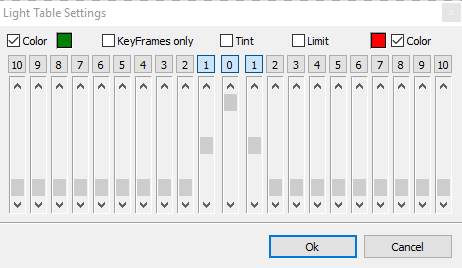
That means that three frames are set up to be visible, frame "0" is the current frame, the left "1" is the previous frame and the right "1" is the next frame.
Usually you draw the animation first using shapes or lines only to concentrate on the movement. Later you fill areas with contours. Depending on what you want to do you can set up the light table transparency or coloring mode for the key frames or your main frame.
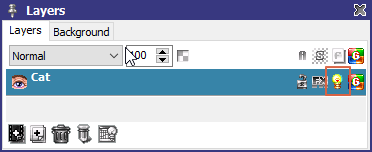
The light table rendering must be enabled for every layer separately using the bulb icon. To concentrate on the shape of your animation you can set up the layers to show a fixed shape color for all non-transparent areas of a frame.

If you want to go with details then you can use the Tint option that will keep all pixels in place and just tints them according to the previous/next color.
To check the animation flow you can switch frames back and forth easily with the defined shortcuts ("1" / "2" is default).
Use the project onionskinning.pmp to play around.
Related topics
Alpha PrimerLayer Effect Settings
Layer Settings
Light Table Settings
Contents
Menu Layers
Tile Mapping Primer
Last modified: 29 January 2023