Working with Brushes
One of the main differences to other art programs is that you can use any pixel portions as a brush to draw with, quickly apply mirror or rotation, stamp it down etc. Of course, you can also have a normal, single colored round or rectangle brush tip to draw with.Selecting normal Brush Tips
At the top left of the main window you can select a standard brush tip using the respective button.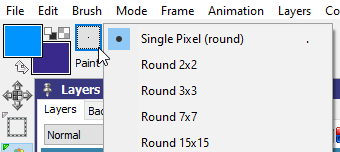
A simple click activates the tip that is already preselected. Hold longer or right-click to select from different predefined sizes or square or round brush tips.
There are also shortcuts for typical brushes like . to quickly select a single pixel round brush or Shift + . for a single pixel square brush. When having single pixel size it of course does not matter if the brush shape is square or circle, but when you resize the brush or if you use pressure sensitive brush sizing then it makes a difference.
Such normal brushes only have a single color and when you select a color index from the color palette then the brush tip will be colorized accordingly.
Custom Brushes
Please load an image or animation of your choice to check out the creation and usage of custom brushes along with the text.In the toolbox you will find tools the let you grab a brush from the canvas easily
and you can place brushes in the brush container for later reuse.
A brush can even contain multiple frames and is then called AnimBrush.
Brush Transparency
Just like the project frames the custom brushes can use simple and alpha transparency. Simple transparency means that one of the colors in the image is considered to be fully transparent while are the other colors are fully opaque. When grabbing a brush in a project with simple transparency then you need to define which color is to be considered transparent. This is typically set up per project, but it is also possible that different layers use different transparent colors because some legit hardware requires so.Grab a Brush
Hit B to activate rectangular brush grab tool. You will see rulers that help with positioning precisely. Just click and drag to select an area you want to grab as brush and release the mouse button:
Now the graphics portion is your brush. You can stamp it down, store it to the brush container or modify it. As an example hit z multiple times to rotate brush by 90° steps counterclockwise or use x or y to flip the directions.
The menu Brush contains a lot of functions that can be applied to a brush such as different transformations concerning size or rotation. Play with them to see what they do. You can restore the brush as you grabbed it by hitting Shift + B.
When you use the right-mouse button during the grab operation, the pixels will be cut off. This way you can quickly move pixel portions around without using selection tools. It is even tempting to just use this brush cut mode to quickly remove unwanted pixels.
When a brush is grabbed (or cut) then you can define different ways to define what portion is considered transparent and also a couple of other options.
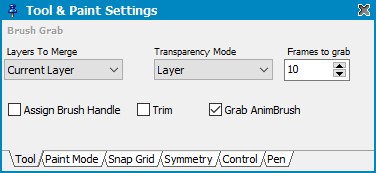
Typically you want to use the project or layer transparent color to also be transparent in the brush, but there are other cases to consider. See brush grab tool settings to learn more. The different modes also define which color is used to fill the area if you cut the brush.
There are different brush grab tools in the group to select free form or by magic wand like selection. Play with them to see what they do. Be sure to always
Colors
Pro Motion NG is strictly working with indexed colors. There is a color palette (per project or per layer or per frame) and pixels are indexes into the respective color palette. That's why changing the RGB color value in the color palette automatically makes all pixels using the color index to look accordingly.When grabbing a brush then it also grabs the color palette along with the pixels. If you use the brush with a project that has a different color palette then all the brush pixels must be remapped to the color palette of the project in order to match again. For example, you picked a brush in a project where color 2 is full red and the brush contains pixels using color 2. If you now switch the project because you want to use the brush contents there and this project uses blue at color index 2 then the respective pixels show blue, not red.
In menu Colors you will find a sub menu Remap Colors to remap the brush to the current color palette. This will try to find the best matches of the colors in the brush in the color palette used by the current project and update it accordingly. If color index 25 is now using the same red as color index 2 does in the brush then the respective brush pixels will be turned to use index 25.
Paint Modes
Menu Mode contains paint modes that are used when drawing with the brush. Check them out on your own to see what they do. There is an important difference when using a single colored (standard) brush tip and a custom brush. A custom brush is always considered multicolored. That means it will not use the color that is currently selected as first drawing color. Instead, the paint mode Paint will use the brush pixels as they are, even you picked a shape the effectively only uses a single color at all pixels.To also draw with the selected color you can use the mode Paint single Color.
Related topics
ContentsSingle Dot Spacing
Toolbox
Last modified: 29 January 2023