Working with Selections
When working on the canvas you can limit the modifications to a selection. There are two ways of selecting, either by defining pixel areas to be selected for modification or by defining pixels that use certain colors to be prevented from being modified (stencil).Pixel Selection
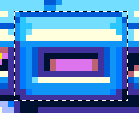
The pixel selection mode is easy to apply and the most common one. Just use the corresponding selection tools from the toolbox. Left mouse button will select the area (e.g. rectangle or circle) and right mouse button will deselect. When a selection tool is active than you can move an existing selection (without the pixels) when hovering over it. To move the selected pixels you need to use the move tool.The selection is displayed using a moving black/white outline:
You can apply different functions from menu Selection to modify the selection definition to your needs.
The selection can be toggled off without losing the definition by using Alt + M or the corresponding button at the toolbox.
Color Selection (Stencil)
A stencil can be used to defined colors that are protected from being modified. You just define color entries in the stencil editor at the color palette that are to be protected and this definition will turn into a corresponding pixel selection definition.
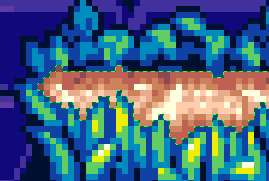
The outline is displayed green and in the given sample you can modify all pixels except the brownish ones.
A special extra option in the stencil definition area is Auto update Stencil. After every modification it will update the selection automatically. If you use one of the brownish colors and draw them somewhere then they will immediately be protected once you finish drawing. Also, if you have an animation, and you flip the frame, it will update the selection definition as well.
Floating Selection
If you start manipulating the selection contents with transformation tools then it will turn into a floating selection.Related topics
Layers PrimerContents
Menu Edit
Last modified: 29 January 2023