Stereo Drawing
Experimental Feature! This feature was included when 3d displays where still used on handhelds like Nintendo 3DS and as a support for doing graphics
for the legit system like Nintendo Virtual Boy and its fans. It does not work with all the tools.
Stereo drawing enables you to create images or animations that use 3D stereoscopic display systems to have the illusion of depth.
In reality the 3D depth is created by the brain based on the images that each eye provide. Since the eyes have a distance, each of them looks onto an object with a different angle. Both images differ based on the view on the object with that angle. The brain then creates a three-dimensional object that we see and where we can differ parts of an object that are more near than others.
Stereo imaging creates two different images as well, one for the left eye and one for the right. Both images differ that way as if the object exists as three-dimensional object in real world.
The straighter an eye looks focused on the corresponding object within an image the lower is the view angle and the object appears more far in the background. The more the object make the left eye look to the right and the right eye look to the left to focus it the more near the image appears.
Now the problem is to have a single image both eyes look at and to ensure that every eye sees a different image. There are a couple of methods to make this happen. The most popular and the most simple approach is to colorize the images with colors that are chromatically opposite, e.g. red and blue (cyan). In that case glasses are used to filter all images parts that are bluish to the right eye and all that are reddish to the left eye. The method is called Anaglyph 3D.
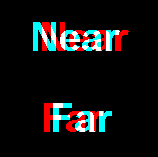
In this test image the objects are the two words. With "Near" you can see that the cyan word which is to be seen by the right eye when using anaglyph 3D glasses goes more to the left, so it makes the right eye look left to focus it. For the left eye the opposite is done the red image is moved more to the right so that the eye has to move there to focus it. The result is that "Near" visually looks near. With "Far" the eyes are made to look more straight and the word appears more in the background.
Another approach to display stereoscopic images is to use interlacing. That means all pixel lines (scan lines) of a display are divided. Every even scan line shows pixels from the left image and every odd scan line shows pixels from the right image. The display uses a special polarization techniques and every image scan lines use another polarization. Special glasses then filter the light so that only even scan lines can be seen on the left eye and odd scan lines on the right eye.
Drawing Stereoscopic Images or Animations
The application supports to have two images for the two eye perspectives. Usually the project width is then as twice as the actual image you want to see. The left and the right half represent the eye images.The stereo drawing settings dialog allow you to define where the left image ends and the right starts.
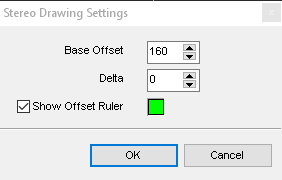
You can set up a ruler to see the setting on the canvas.
When drawing an image you see the left image as the main image and displace the pixels for the right image horizontally. There are three basic tools that help doing this: copy, smart copy and clone as to be selected in menu Processing/Enable Stereo Drawing. They all need to know how much the right image pixels are to be displaced and into which direction. This displacement can be modified with the keys Alt + Q and Alt + W and the value is displayed in the coordinates panel at the bottom of the canvas window.
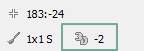
That means if you draw something with one of the stereo drawing tool modes then the right image pixels are displaced by this value either to the left (negative value) or to the right (positive value).
Copy
With the copy mode you draw on the left side it just creates copied pixels on the right side with the displacement offset. So the complete object you draw is either set into the near or into the depth, e.g. a line.Smart Copy
This more extends the copy mode because you can start drawing a line with a displacement value x and when you still hold the mouse button you can displace the second point of the with a displacement value y. Both values are then shown in the dimensions panel.This currently only works for the tools line, curve, fill.
Clone
Works with a single displacement value, but it does not draw pixels to the left image. Instead, it just copies existing pixels of the left image displaced to the right image.Stereoscopic View Modes
The two mentioned view modes Anaglyph and Interlaced 3D can be enabled in menu Processing/Enable 3D View, and they affect the animation/preview window only.Related topics
ContentsMenu Processing
Last modified: 11 February 2023