Color Palette
The onscreen palette helps you to quickly select and change colors. At the bottom you find two main tabs that let you switch between a simple palette display and the section that provides different palette edit options.The edit workspace divides into five sections:
RGB editor to control Red, Green and Blue color channels
HSL editor to control Hue, Saturation and Brightness color channels
Palette editor to reorganize, sort, manipulate and ramp palette entries
Multi color HSLC editor to control Hue, Saturation, Brightness and Contrast of a selected color range
Stencil editor to define masked colors to be protected from modification while drawing. They are applied to the pixel selection.
Global functions
The detail display shows color information when the mouse pointer
is moved over the palette entries: x/X=R,G,B #RRGGBB where
shows color information when the mouse pointer
is moved over the palette entries: x/X=R,G,B #RRGGBB where | x | color number (decimal) |
| X | color number (hexadecimal) |
| R,G,B | decimal RGB values |
| #RRGGBB | hexadecimal RGB values |
Use Web# to edit the currently selected color as hex web code. This edit field receives the focus automatically if you enable the option Auto activate Color Edit at the window options menu.
Remap colors will remap the original palette colors to the new manipulated palette. That means for every RGB color value of the palette on plugin start will be set to the closest match within the palette when the plugin is closed.
RGB and HSL editor
Use the three sliders to manipulate one of the RGB/HSL color channels. You may also click into the rendered color ranges below the sliders.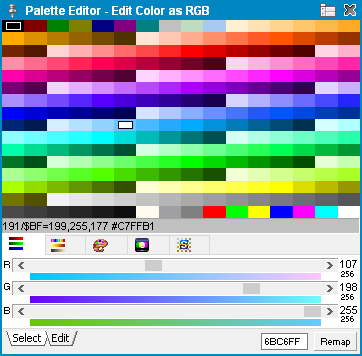 |
double click --> | 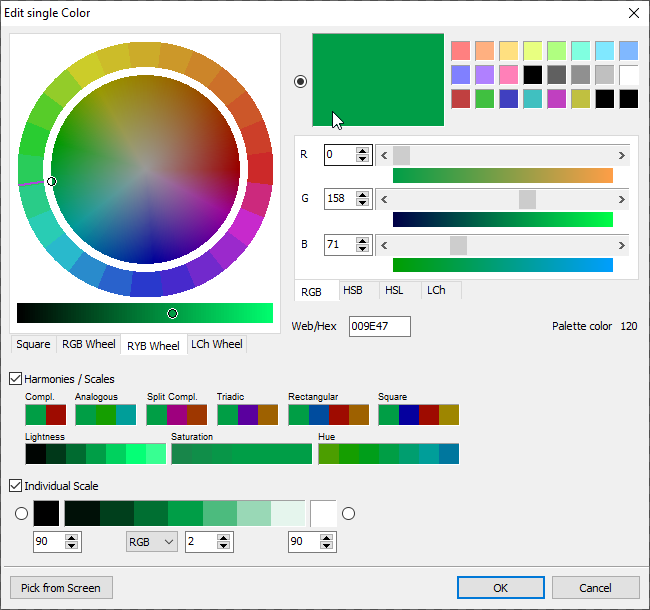 |
Double click on a color to open a separate color editor that enables you to enter numeric values.
Hit "C" to start the quick copy mode which copies the current selected color to the next slot you click on.
Hit "R" to start the quick ramp mode which ramps from the currently selected color to the next slot you click on.
Hit "S" to start the quick swap mode which swaps the currently selected color with the next slot you click on.
Palette editor
The palette editor allows you to select multiple color entries to apply color effects like gray, invert or ramp as well as moving the colors around with different modes like replace or swap.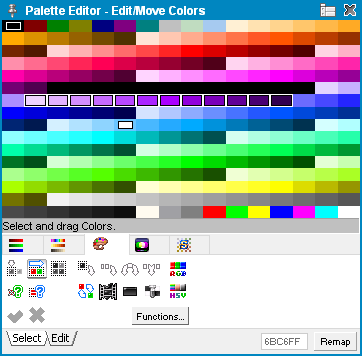
If a color is actually used within the project can be checked using
 . It will
mark every unused color with a cross.
. It will
mark every unused color with a cross.To apply movements or color functions you must select the colors that are to me manipulated.
There are three selection modes:
 |
Click to select a single entry. Hold Ctrl to select or deselect additional entries. |
 |
Click and drag to select a continuous range of colors. |
 |
Click and drag to select a rectangle color range. |
 |
Selects all colors that are not used within the project. |
Moving colors
As soon as you have selected a color range you can click on it again, hold the mouse button and drag the colors to a new position. When dragging you can hold Alt to compact the selected colors so that they are repositioned side by side. The movement will be applied finally if you either click outside the selection (cursor turns to ok) or by using the green tick button that appears.If you use the single color selection mode then you can drag immediately when selecting a color. Then you don't need to release the mouse button again.
There are four different move modes:
 |
Copies the selected colors to the new position and makes the original colors black. |
 |
Copies the colors to the new position. |
 |
Swaps the colors of the new position. |
 |
Cuts the colors from the old position and inserts to the new position. |
If you enable the option Apply Color Movement to Pixels at the window options menu then all pixels that use one of the moved colors will be changed to reflect the new color position in the palette. This option is enabled by default. If you switch it off then pixel stay as they are, and you can use the color remap function to let pixels correct their colors by finding the best matching throughout the palette.
Color functions
You can apply different standard functions to selected colors (if none is selected then all colors are affected): |
Flips the selected color order. Only works with range or rectangle selection. |
 |
Turns the selected colors to gray scales. |
 |
Makes the selected colors black. |
 |
Inverts the selected colors based on their RGB values. |
 |
Ramp the selected colors with RGB or HSL mode. Only works with range selection. |
Use the Functions... button to open a menu with additional color functions such as sorting, selection, copy, paste and many more. There are different sort modes: by brightness, by hue, by saturation, by color (tries to place the nearest colors side by side) and by popularity (sorts by pixel usage), by appearance (the color is first that appears first in the image etc.).
Multi color HSBC editor
The HSBC editor allows you to select multiple color entries to modify Hue, Saturation, Brightness and Contrast.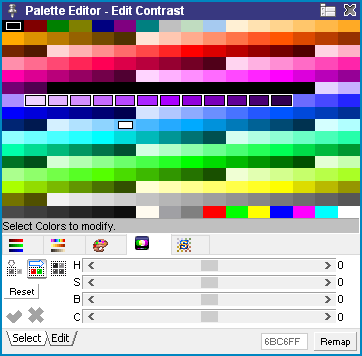
The selection modes are the same as for the color manipulation.
Stencil Editor
You can make certain colors to be protected when drawing using a stencil pixel selection. To activate it just select colors to be protected with the left mouse button or deselect it with the right mouse button. The selection mode will be activated and shows the selected areas on the drawing canvas.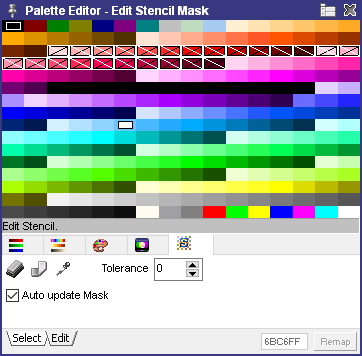
 |
Inverts the stencil color selection. |
| Deactivates the stencil selection mask by deselecting all colors. | |
 |
Activates the color pickup tool for stencil colors so that you can choose them with left or right mouse button directly on the canvas. This can also be done with the normal pipette tool from the tool box |
The tolerance setting will also affect colors that are similar to one that is chosen depending on the tolerance level. Auto update Stencil will reapply the stencil selection to the pixel selection when the image is modified or switched to another animation frame.
Window settings
Use the menu icon in the title bar to set up some options to better match your needs.Auto activate Color Edit will focus the web color edit field as soon as you click on a color.
Apply Color Movement to Pixels ensures that all pixels throughout the project .
Auto select Color also selects the color as first/background brush color even if you are in color management areas where you move colors or change contrast etc..
Auto commit Movement immediately applies movement when enabled. If not enabled then you have to commit the changes manually using the "Ok" button.
Related topics
Color DialogC64 Graphics
Layer Settings
Menu Options
Palette Window
Toolbox
Workspace
Last modified: 29 January 2023