Toolbox
On the left main window area you can select different drawing or processing tools. For quick access you can use the predefined shortcuts as shown in brackets.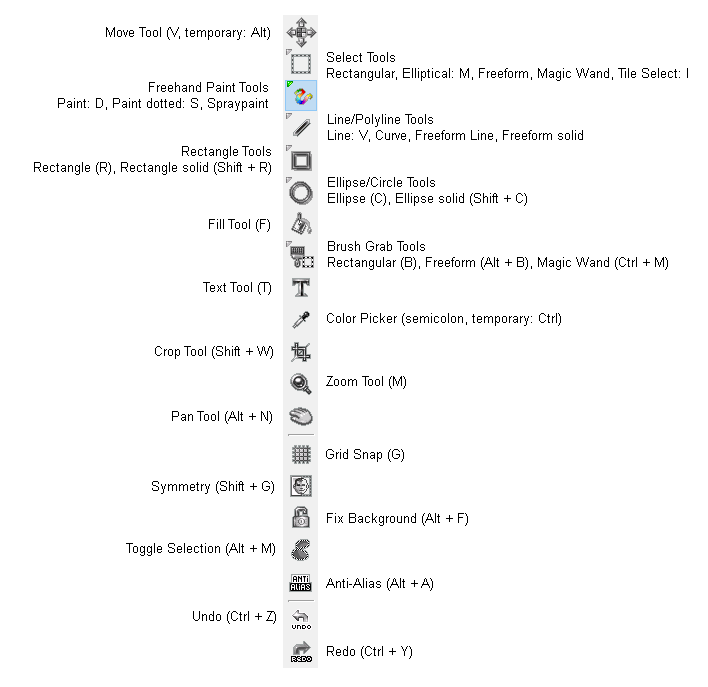
Move Tool
Select Tools
Freehand Paint Tools
Line/Polyline Tools
Rectangle Tools
Ellipse Tools
Fill Tool
Brush Grab Tools
Text Tool
Color Picker Tool
Crop Tool
Zoom Tool
Pan Tool
Snap Grid
Symmetry
Fix Background
Toggle Selection
Anti-Alias
Remarks
Each icon symbolizes a special tool. A tool is activated by clicking on it with the left mouse button or by using the shortcut [...]. When you move your mouse on a tool icon then some short information appears.Some tool buttons have a tool group that appears when holding the left mouse for a short time or when you right-click on it. Then a submenu appears.
Tools in a group can share the same shortcut. In that case using the shortcut will cycle through the respective tools.
All drawing tools work the same way. If you use the left mouse button the current first color and/or the currently selected paint mode is used (see menu Mode). If you use the right mouse button then you draw with the selected second color or a special inverse mode depending on the selected paint mode.
When using drawing tools you can lock the mouse movement to either horizontal or vertical direction. This can be done by holding the Shift key. Then the first movement defines the movement that is not to be locked. If you for example hold Shift and move down or up then the horizontal movement is locked as long as you continue holding Shift.
For tools which create objects like line, rectangle, circle etc. the object sizes are displayed in the information panel. See descriptions for the workspace.
A lot of tools have additional options. If you select a tool with options then you can find its options in the Tool & Paint Settings dialog, tab "Tool".
Also, always have a look at the bottom line of the main window to get hints about how to use a tool in its current state.
Move Tool (V, temporary: Alt)
Shortcut:Moves a selected portion or a floating selection on the canvas. If there is no selection then it will automatically select opaque pixels. Hold Ctrl to leave a copy of the pixels to be moved.
Select multiple layers and frames to move them all at once.
Alt will temporarily activate this tool as long as it's hold.
Select Tools
The are used to select certain areas on the canvas to either protect the unselected parts from being modified or to move the selected portion around. Hold Shift when starting the selection to add to an existing selection. Hold Ctrl or use the right mouse button to remove from selection.Rectangular/Elliptical Select Tool (M)
Select or deselect an area made up of a rectangle or ellipse. After starting but before releasing the mouse button you can use Shift to create a square/circle and Ctrl to create the shape in centered mode.When you hover over a selection then you can move it around without moving pixels.
Additional options
Use the Extended Edit mode to create or rotate the shape dynamically by having handles around it then can be used to move corners and edges.
Freeform Select Tool
Selects or deselects by a freely drawn shape. If mouse button is hold then you draw freehand. If the mouse button is released then a straight line can be defined until the next click. The shape will automatically close if you reach the starting position again.Additional options
Auto Close will immediately close the shape after releasing the mouse button.
Magic Wand Select Tool
Selects or deselects by finding matching colors based on a tolerance value.Additional options
Tolerance defines the maximum distance of colors to be included based on the color of the starting pixel.
Isolated only recognizes pixels that touch the starting pixel and match the tolerance.
Tile Select Tool (I)
Selects or deselects a tile area on the canvas defined by either the tile mapping engine or the snap grid.Freehand Paint Tools
Paint Tool (D)
Draw contiguous strokes freehand.Additional options
See settings.
Paint dotted (S)
This tool stamps the current brush on the canvas as single dots. That means it creates a row of single brush dots without connecting them to a line. The faster you move you mouse while drawing the more space will be between these dots where you can also set up a minimal distance in the options. If you hold the Alt key while drawing with this tool then the AnimPainting is started if enabled by option. That means that you automatically advance through the frames while drawing. Hold the Alt + Ctrl keys to stamp an AnimBrush down over multiple frames if the corresponding option is enabled.Additional options
You can set up a minimal dot distance in the tool settings.
Spray Paint Tool
The spray paint tool is used to simulate an airbrush. There are two different spray types that can be used.Additional options
You can set up spray options tool settings.
Line/Polyline Tools
Line Tool (V)
Draws a straight line using current brush.Hold the Ctrl while the mouse button is down to create a centered line. Shift will lock the angle to isometric values as defined in the options.
Hold Alt key before releasing the mouse button to use AnimPainting.
Additional options
The dot settings for lines allows you set up different line draw modes.
Curve Tool
Draws a three point spline curve. In a first step you define start and end point of the curve by drawing a straight line as it is done with the line tool.In a second step you define the third point to bend the line into a curve
Additional options
The dot settings for lines allows you set up different line draw modes.
Freeform Line Tool
Selects or deselects by a freely drawn shape. If mouse button is hold then you draw freehand. If the mouse button is released then a straight line can be defined until the next click. The shape will automatically close if you reach the starting position again.Additional options
The dot settings for lines allows you set up different line draw modes.
For when using the freehand drawing mode then you can set up Pixel perfect Drawing as outlined in the paint tool settings.
Filled Polygon / Contour
Draws a filled polygon that can consist of straight lines or freehand drawn parts. If mouse button is hold then you draw freehand. If the mouse button is released then a straight line can be defined until the next click. The shape will automatically close if you reach the starting position again.If a gradient fill mode is selected then you possibly need to define gradient direction, length and position in a second step. Hold Space and drag with mouse button down to move the gradient position.
Additional options
Like in the fill style dialog lets you choose between different fill modes.
Auto Close will immediately close the shape after releasing the mouse button.
Rectangle Tools
Rectangle Tool (R)
Paints a rectangle using the current brush. After starting but before releasing the mouse button you can use Shift to create a square and Ctrl to create the shape in centered mode.Additional options
Dot spacing for lines settings are available.
Use the Extended Edit mode to create or rotate the shape dynamically by having handles around it then can be used to move corners and edges.
Rectangle solid Tool (Shift + R)
Paints a rectangle filled with a selected mode.Shift to create a square and Ctrl to create the shape in centered mode.
Additional options
Define a fill mode as described in the fill style dialog
Use the Extended Edit mode to create or rotate the shape dynamically by having handles around it then can be used to move corners and edges.
Ellipse Tools
Ellipse Tool (C)
Paints an ellipse using the current brush. After starting but before releasing the mouse button you can use Shift to create a circle and Ctrl to create the shape in centered mode.Additional options
Dot spacing for lines settings are available.
Use the Extended Edit mode to create or rotate the shape dynamically by having handles around it then can be used to move corners and edges.
Ellipse solid Tool (Shift + C)
Paints an ellipse filled with a selected mode.Shift to create a circle and Ctrl to create the shape in centered mode.
Additional options
Define a fill mode as described in the fill style dialog
Use the Extended Edit mode to create or rotate the shape dynamically by having handles around it then can be used to move corners and edges.
Fill Tool (F)
Use this tool to fill an area of a certain color or colors that match a tolerance with either another color, a color gradient or a pattern.Click into the area you want to fill and release the mouse button. If a gradient fill mode is selected then you possibly need to define gradient direction, length and position in a second step. Hold Space and drag with mouse button down to move the gradient position.
Additional options
To select a fill style use the fill style dialog.
You can select multiple frames on the timeline to fill each of them.
Activate Layers option to use the fill detection to be used with all visible layers.
Brush Grab Tools
These tools pick pixels from the canvas as custom brush. Using right-click with the tool cuts the pixels off the canvas.Rectangular Brush Grab Tool (B)
Use this tool to create a custom brush with a rectangular definition. Just select the area you want to pick as a brush.Additional options
See settings for additional grab options.
Freeform Brush Grab Tool (Alt + B)
Defines the portion to be grabbed as brush by a freely drawn shape. If mouse button is hold then you draw freehand. If the mouse button is released then a straight line can be defined until the next click. The shape will automatically close if you reach the starting position again.Additional options
See settings for additional grab options.
Magic Wand Brush Grab Tool (Ctrl + M)
This tool mode selects an isolated bitmap area as a brush that is either limited by the background color, transparency or colors that match the given tolerance value.Additional options
See settings for defining grab mode and other options.
Text Tool (T)
Click on this tool to create a brush from a text using the installed Windows fonts or bitmap fonts.Color Picker Tool (,, temporary Ctrl)
Use the pipette to get a certain color from an image as first (left mouse button) or background color (right mouse button). For a temporary pipette use the Ctrl key. The pipette will then appear as long as you hold this key down. This is very useful for quick color changes.Additional options
Double click enters color editor for the respective color index.
Hold Alt to replace the color with left or right mouse button click.
Holding Shift selects/unselects the color in the floating palette editor (selection mode).
More options can be found in the settings dialog.
Crop Tool (Shift + W)
With this tool you can select an area to reduce the image size to. After initial selection use Enter to finalize or Esc to cancel.Additional options
With the Select Minimum you can automatically select all opaque pixels over all frames and layers.
Zoom Tool (M)
The zoom tool lets you zoom into the current image. There are different zoom modes.A simple click on the canvas with the left mouse button increases the zoom level one step where the right mouse button decreases.
To zoom into a certain area left-click on the canvas and drag to define a region that is to be zoomed.
Additional options
If Relative Zoom is enabled then click and drag left or right to decrease or increase zoom level.
Double-click on the tool box icon to select 1x1 zoom level.
Pan Tool (Alt + N, temporary Space)
Use this tool to move the canvas with your mouse to navigate quickly.Snap Grid (G)
The grid can be used to let the brush or mouse position snap to cross points of a defined grid.Additional options
Use the snap grid settings to apply grid size, alignment and behavior.
Symmetry (Shift + G)
You can activate an automatic symmetry mode that will duplicate brush dots while drawing. This way you can create simple mirrored objects (horizontal or vertical mirror) or complex multi symmetric objects.Additional options
Use the symmetry settings to apply grid size, alignment or symmetry behavior.
Fix Background (Alt + F)
This function simply takes the current image and uses it as background. If you now draw something on this image with the first color it can be removed again by using the background color. Instead of drawing with the background color the image is restored.Toggle Selection (Alt + M)
Switches the selection mask on or off. There are two types of selection. You can either select single pixels to be protected or you can select colors that are protected. Color selection masks are called stencil. You can define which colors to be protected in the stencil tab of the floating palette editor.Anti-Alias (Alt + A)
Use this option to remove aliasing effects. Such effects occur, if you for example draw a line on the canvas. When this option is enabled then the pixel "stairs" are softened.Undo (Ctrl + Z) / Redo (Ctrl + Y)
All image modifying operations can be made undone. That means you can for example draw three lines and by pressing undo you can remove these lines step by step and with redo you can redraw them again.Related topics
AnimBrush SettingsAnimated brushes and AnimPainting
Brush Grab Settings
Dot spacing settings for lines
Magic Wand Brush Grab Settings
Color Palette
Single Dot Spacing
Snap Grid Settings
Spray Paint Settings
Symmetry Settings
Tool & Paint Settings
Workspace
Last modified: 29 January 2023